<img src="https://ws.zoominfo.com/pixel/Nfk5wflCTIIE2iSoYxah" width="1" height="1" style="display: none;">

Lift Custom Object Interface for HubSpot - Support Documentation

The Lift Custom Object Interface for HubSpot allows any HubSpot portal Super Admin to create, update, and orchestrate their custom objects in a few easy steps. To have easy access to the app, we recommend bookmarking the launch page. You will need to access this page to go through the launch process each time you use the app for authorization purposes. Below you'll find all the instructions on how to install, use, and uninstall the Lift custom Object Interface for HubSpot.

If you can't find what you're looking for or have any questions, please contact Customer Support.

If you think something is wrong with the interface, check the Maintenance Status page first for any outages before contacting Customer Support.

Prerequisites to installing the app: 

  • Any HubSpot Enterprise Hub Subscription
  • Super Admin access to the portal the app is being installed in
  • An understanding of custom objects and a plan for how you're going to use them

How to Install:

1.  On the access page, click on the button, "Click Here to Access the Lift Custom Object Interface for HubSpot."

install-1

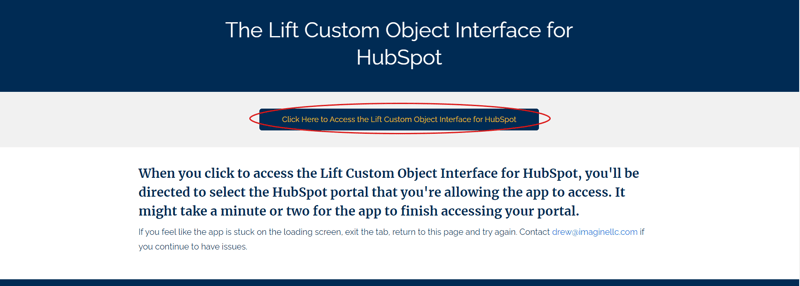
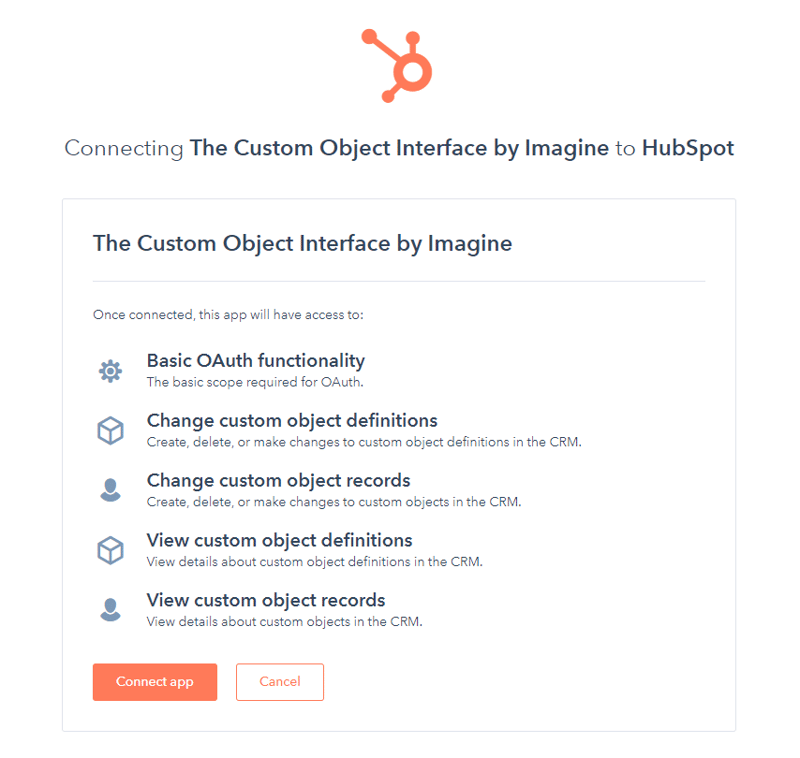
2. Connect your HubSpot portal
Note: HubSpot will have you confirm the authorization to utilize the app with CAPTCHA.

COUI-Support-Image_2

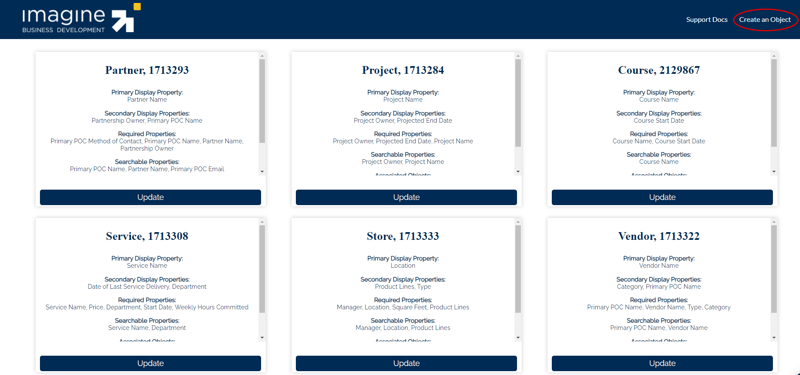
Your Lift Custom Object Interface will now be connected. You'll be redirected to the main screen to begin creating custom objects. The object display view will be empty except for a line of text letting you know you don't have any custom objects created.

COUI-Support-Image_4There is a chance that the redirect will take a few minutes. If so, your screen will have a message that says, "Completing final authorization steps." If the page doesn't redirect after a few minutes, go back to the launch button and try it again. 

COUI-Support-Image_5There's no other configuration needed in order for you to start creating custom objects. 

To continuously have easy access to the app, we recommend bookmarking the launch page. You will need to access this page to go through the launch process each time you use the app for authorization purposes.

To have easy access to the app, we recommend bookmarking the launch page. You will need to access this page to go through the launch process each time you use the app for authorization purposes.

1. In the top right-hand corner of the screen, click on "Create an Object."

LCOI-Support-Image-3

2. Confirm that you want to continue to create an object. 
Note: Before you move on, the app will prompt you to make sure you have: 

  • Gotten familiar with what an object is
  • Determined that a custom object is the best solution for your problem
  • Outlined how your custom object fits into the Entity-Relationship-Diagram for your database
  • Outlined your new custom object's initial schema

COUI-Create-Image_1

3. Fill out the form to create your object. 
Note: For help with filling out the form, here are the meanings of each field: 

  • Object Name: The name HubSpot uses on its back-end to refer to your custom object. The back-end is the only thing that uses the "Object Name", but it should be consistent with your Object Labels.
  • Object Label - Singular: The name HubSpot uses to refer to a single record of your custom object.
  • Object Label - Plural: The name HubSpot uses to refer to multiple records of your custom object. The Plural label is used in your custom object's views and property settings.
  • Primary Display Property Name: The name of the single-line text property that will be defined when your custom object is created. This will be the name of the property that will hold the data that best identifies any record of your custom object. The data for the Primary Display Property is used on associated records of other object types, used to search through your custom object records, and required to create a record of your custom object. 
  • Associations: The objects associated to your custom object by HubSpot's back-end. By defining associations you can associate records of your custom object to records of other types, so you can access the data in one of your custom object records that is relevant to a record of a different object type.

4. Click the "Create Your Object" button.

COUI-Create-Image_2

5. Your object is now created. Exit out of the overlay and the object display view will automatically refresh to show your new custom object.

COUI-Create-Image_3

To have easy access to the app, we recommend bookmarking the launch page. You will need to access this page to go through the launch process each time you use the app for authorization purposes.

1. Go to the custom object you want to update and click the "Update" button on the associated card.

LCOI-Support-Image-7

2. Update the corresponding fields.
Note: For help with updating fields, here's a list of what each field means:

  • Primary Display Property: The property that is the best identifier for one of your custom object's records. This is the property with data displayed first on a custom object's record, anywhere it is displayed.
  • Secondary Display Properties: A maximum of two properties that provide significant context to one of your custom object's records. These properties are displayed by default along with the Primary Display Property wherever a custom object's record might be displayed. 
  • Required Properties: The properties required to manually create a new record of your custom object. The data held in these properties are the bare minimum required for a record to have value in the CRM.
  • Searchable Properties: A maximum of 3 properties (usually including the Primary Display Property) that can be used to search through all of your custom object's records. These properties should hold data that can be fairly unique to each record.
  • Associations: The objects associated to your custom object by HubSpot's back-end. By defining associations you can associate records of your custom object to records of other types, so you can access the data in one of your custom object records that is relevant to a record of a different object type.

3. Click "Continue Updating Your Object."

LCOI-Support-Image-4

4. Confirm that all the information is correct and confirm the Custom Object ID. Then Click "Update my Object."

LCOI-Support-Image-5
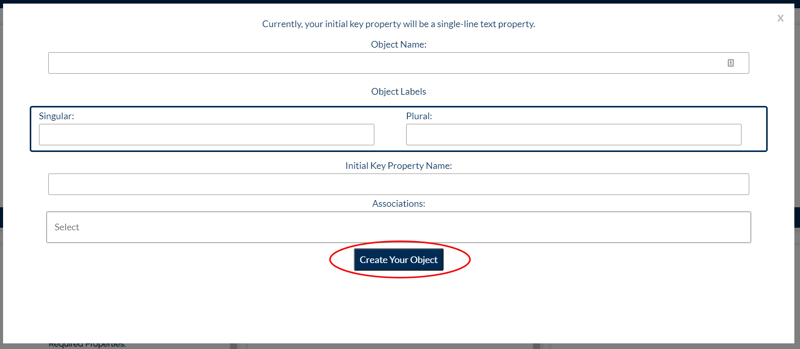
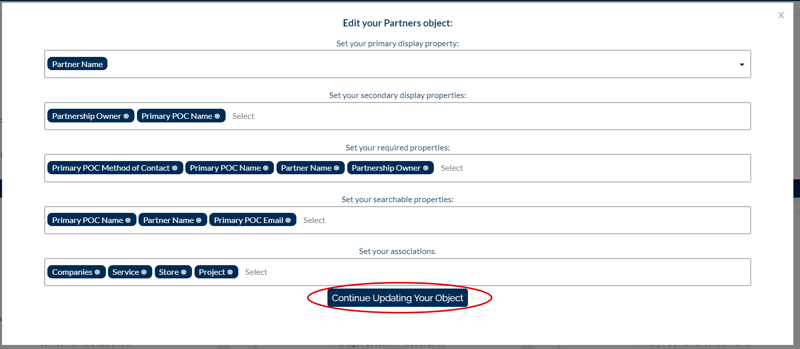
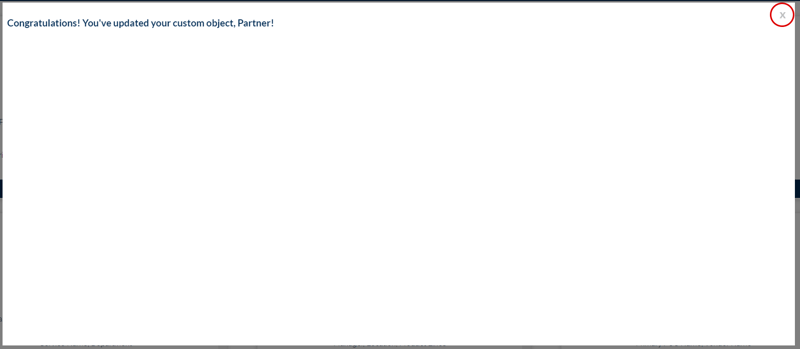
5. Your object will now be updated. Exit out of the overlay back to the object display view. The page will automatically update and reflect the changes you made. 

LCOI-Support-Image-6


Rather than walking you through the step by step process with screenshots, our developer on the project, Drew Davidoff, has created a simple video that will walk you through the process. 

Before you uninstall the app, make sure you truly want to uninstall the app. Doing so will make it harder to work with your custom objects as you'll have to use coding to add and update them. 

To Uninstall: 

1. In your HubSpot portal, go to Settings located at the top right-hand side of your screen. 

COUI-Uninstall-Image_1

2. On the left-hand side of your screen, click on the "Integration" drop-down item and select "Connected Apps." 

LCOI-Uninstall-1

3. Find the Lift Custom Object Interface for HubSpot app, click on "More" next to the name and choose "Uninstall." 

LCOI-Uninstall-2